Enhances the asset management process by adding a completion state attribute to every asset in the project.
Technical Support
For questions or additional technical support please contact us per Mail or join our Discord server.
Installation
For consistent usage of a team it’s required to install this plugin as part of the project; So every team member can use this tool to manage the asset states. To do this perform following steps after you have purchased the plugin:
- Open the Epic Games Launcher and navigate to the plugin in you ‘Library’
- Press the ‘Install to Engine’ button and select the engine version that matches to you project. This will download the plugin files into you local installed engine.
- Locate the plugin in the engine’s plugin directory (usually found at C:\Program Files\Epic Games\UE_5.x\Engine\Plugins\Marketplace). Copy the entire plugin folder.
- Paste the copied plugin folder into the Plugins folder you created in your project directory.
- Open your project in UE an check if the plugin is available. Go to Edit->Plugins. In the Plugins window, search for the plugin. Check if the ‘enabled’ checkbox is set. The plugin should be enabled by default.

If you have a custom build version of the Unreal Engine it can be necessary to compile the plugin locally.
- Delete the Binaries and Intermediate folder in the plugin folder that you have copied to remove the old binaries.
- Launch your project by clicking on your .uproject file
- Press ‘Yes’ on the widget that ask for rebuilding modules.
Usage
The plugin blend in the engine there is not dedicated UI. you can find all configurations in the standard engine menus and settings.
Set States
To assign a state to one of you assets; Open the context menu by right click (1) on them and go to the Compleation state in the common section (2). There will be all available states listed. If the asset has already a state it will be represented by the selected checkbox in front of that state (3).
Click on one of the state to assign it to the asset (4a). To remove the current state from a asset; Select the Delete State option that will remove it from the selected asset (4b).

Multiselection of assets is also supported. So it’s possible to assign a state fast to a bigger amount of assets.
Asset State Visualization
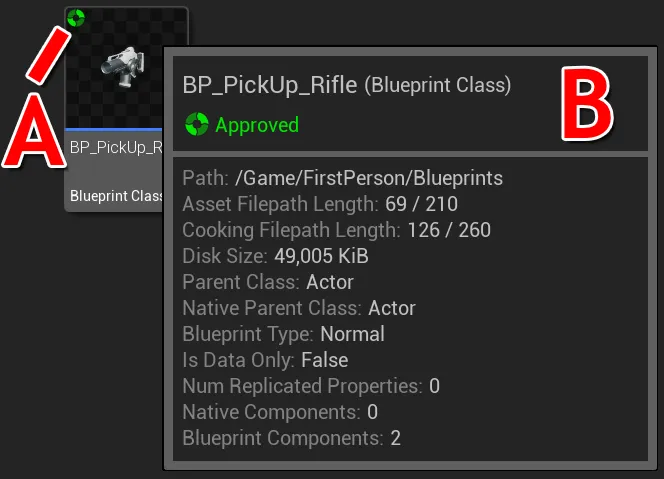
After an asset gets a completion state assigned, it will be shown on that asset. There are two type of indications. The first one will be shown directly on the asset tiles top left corner in the content browser. It shows the plugin icon tinted in the color of the assigned state (A) and allows a fast recognition of the asset completion state with a simple look. The second one is more detailed and also lists the state name and can be found in the detail tooltip of the asset (B). This will be shown while hovering your mouse cursor over an asset tile in the content browser.
Filter
The assigned states on the assets can be used to filter them. For this purpose a filter is already prepared for the Content Browser. To activate them click on the filter button in you Content Browser (1). In the Other Filters section open the Other Filters (2) group. Find there the Asset Completion State filter and activate them by checking the checkbox (3).
Filter location
Content Browser -> Filter Menu -> Other Filters -> Asset Completion State

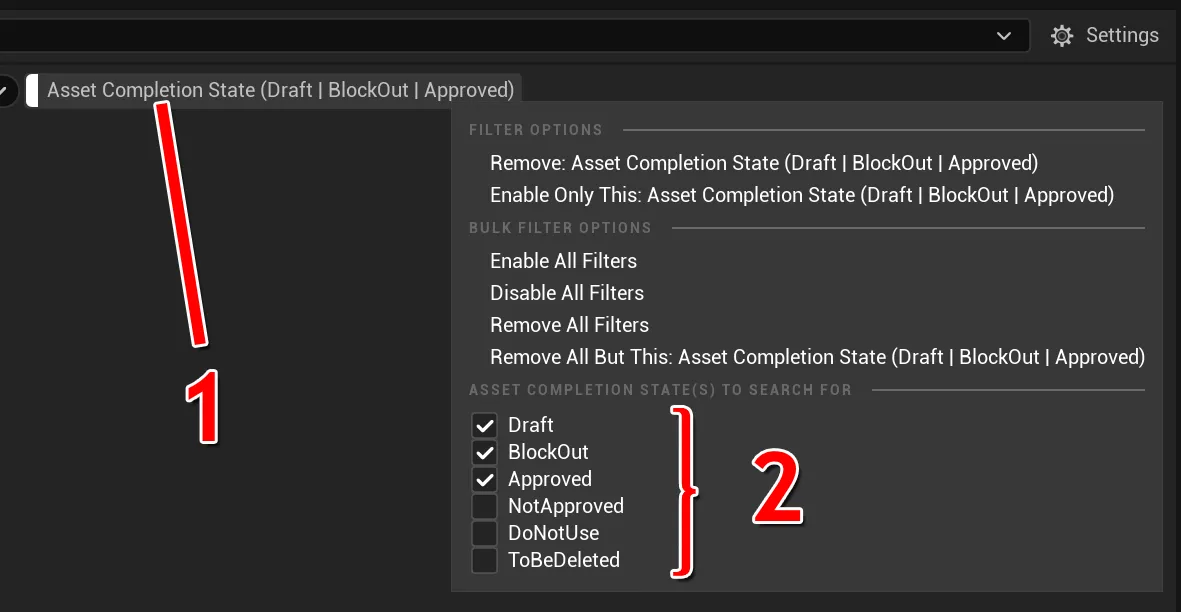
After the filter is activated you can find them in the Filter Display area. By default the filter will show the states Draft, BlockOut and Approved. To adjust what get shown ‘right click’ on it to open the context menu (1). There is a Asset Completion State(s) To Search For section where the shown asset states can be configured (2). Select what kind off sets should be shown. Assets with different states will be filtered out in this Content Browser.
Every Content Browser can have its own filter with their own configuration.
Additionally it is possible to use the ‘advanced search syntax’ in the Content Browser search field. To filter by asset completion states use the ‘CompletionState’ option as the key. You can use every available operator from the ‘advanced search syntax’ on it. Below are a couple of common examples:
Filter a specific state
    CompletionState="BlockOut"
    CompletionState==Approved
    CompletionState:ToBeDeleted
Filter not a specific state
    CompletionState!=BlockOut
    CompletionState!:DoNotUse
Filer all Assets with a state
CompletionState=""
Settings (Customization)
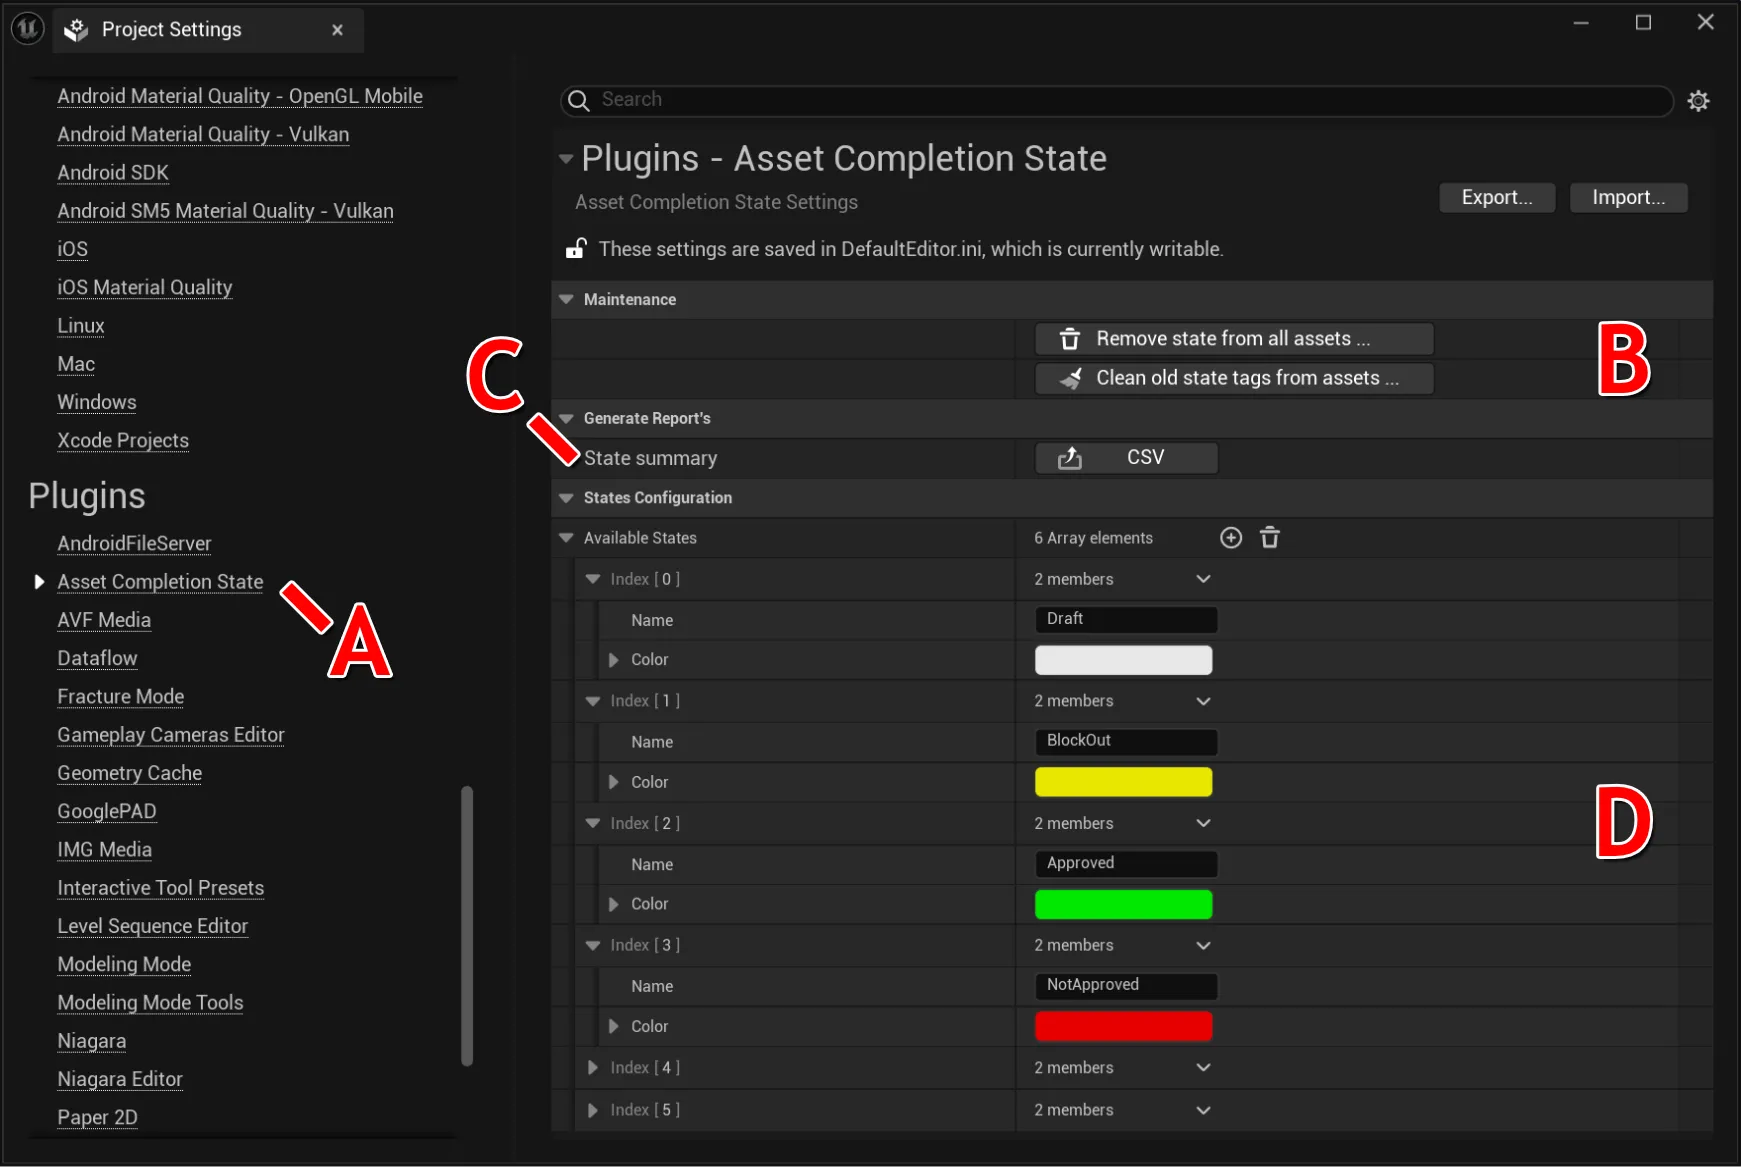
Asset Completion State in Project Settings
- (A) Plugin settings entry
- (B) Maintenance functions
- (C) Generate reports
- (D) Available Asset states
Maintenance
Housekeeping functions that will assist to keep you project clean. This operation are sensitive, please double check all files that got changed. All touched assets get reported in the log.
Remove state from all assets …
Will go trough all assets in you project and remove all existing asset completion state data from it. This will reset all existing assets to the state like they would be without this plugin. This function can be used to deinstallation all plugin related data.
Clean old state tags from assets …
Will go trough all assets in you project and remove all not existing states from assets that are not in the Available States list any more. This function is helpful to clean up existing data after a state get removed from the project.
Generate Reports
Generate reports of all assets that have an assigned completion state. Its a fast and simple way to get an overview of the current states of your assets and keep track of their progress. A report consists of a CSV table for every existing asset state and every table contains a list of every asset in the project that have this state assigned.
Every entry contains the following information:
Content of a asset entry
- Asset Name
- Reference Amount
- Type
- Paths
- Date modified
- Last User
If there is a CMS system connected to your Unreal Editor, the ‘Last User’ and the ‘Date modified’ cell will be filled with the data of the last commit on this asset. If this is not available, the ‘date modified’ will show the last modification date of this asset on your file system.
Asset State
Define a list of states that can be used to classify the status of your assets. A state consists of a name and a color for faster recognition. Customize the available asset states to reflect your workflow. The order of the entries will also reflect the order in the context menu where you can assign the current state to assets.
Following states are predefined to provide a fast starting experience. But keep this as inspiration to extend or change them to fit to your project
Default states (examples)
- Draft - Proxy of a new asset
- BlockOut - Rough approximation
- Approved - Checked and free to use
- NotApproved - Did not pass check
- DoNotUse - Illegal to use at the moment
- ToBeDeleted - Marked to get removed soon
Current Limitations
The asset filtering only works in Content Browser at the moment. Asset Picker in the detail panel are not effected by the filter.